Setup
Interface Setup
When the PLZ-4W/PLZ-4WL/PLZ-4WH is shipped from the factory, the RS232C connector has a cover. Keep the cover so that you can attach it to the RS232C connector when the connector is not in use. For safety, always attach the cover to the RS232C connector when the connector is not being used. If the cover is damaged or lost, contact your Kikusui agent or distributor.
RS232C
RS232C connection
Turn off the POWER switch on the PLZ-4W/PLZ-4WL/PLZ-4WH and the computer.
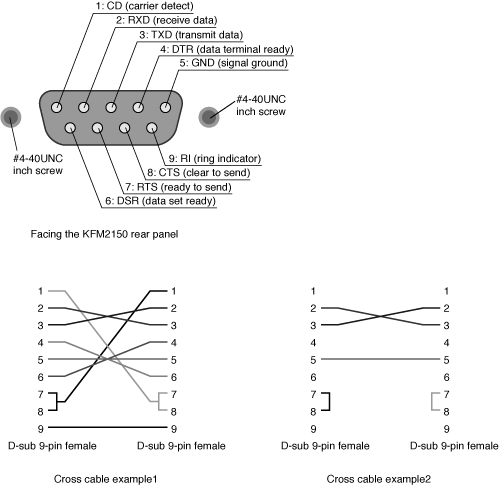
Use a D-sub 9-pin female-to-female AT type cross cable for the RS232C cable. Figure shows the connector pin assignments.
The PLZ-4W/PLZ-4WL/PLZ-4WH does not use hardware handshaking (Cross cable example2).

9-pin AT type connector
RS232C configuration
1. Check that the LOAD LED is turned off.
If it is on, press the LOAD key to turn it off.
2. Press the MENU (SHIFT+SET/VSET) key to displays the menu.
3. Press the CURSOR key several times until the Configuration menu item is highlighted. Then press the ENTER key.
4. Press the CURSOR key several times until the Interface menu item is highlighted. Then press the ENTER key.
5. Check that the cursor is blinking by Control on the menu, and turn the rotary knob to select RS232C.
If it is not blinking, press the CURSOR key to blinking.
6. Press the CURSOR key and check that the cursor is blinking by Baudrate on the menu. Then, turn the rotary knob to set the baud rate.
7. Press the CURSOR key and check that the cursor is blinking by Data, Stop on the menu. Then, turn the rotary knob to set the stop bit.
The data length is fixed to 8 bits.
8. Press the CURSOR key and check that the cursor is blinking by Ack on the menu. Then, turn the rotary knob to set the acknowledge.
9. Press the MENU (SHIFT+SET/VSET) key. The original screen displayed before entering menu setup appears.
10. Power cycle the PLZ-4W/PLZ-4WL/PLZ-4WH.
The settings are confirmed.
Protocol
Table shows the RS232C protocol.
Underline indicates factory default condition.
| Item | Setting |
|---|---|
| Connector | 9-pin D-sub terminal on the rear panel |
| Baudrate | 2 400 bps/ 4 800 bps/ 9 600 bps/ 19 200 bps |
| Data length | Fixed to 8 bits |
| Stop bit | 1 bit / 2 bit |
| Parity | Fixed to none |
| XON/XOFF control | ON/ OFF |
Transmission / Reception via the RS232C
Control the transmission / reception via the RS232C using X-flow control or acknowledge function.
Transmission / reception may not work correctly through unilateral transmission.
Acknowledge
When set to Ack ON, the string OK or ERROR is sent to the host for set commands. For query commands, the response data is sent to the host as usual.
X-Flow control
If acknowledge is OFF, X-Flow control is always used.
Break signal
The break signal functions as a substitute for the IEEE488.1 dcl / sdc (Device Clear, Selected Device Clear) message.

