RMT CONT SOFTWARE FOR PCR-LE/PCR-WE SD021-PCR-LE
Operation Guide
Selecting the PCR to Control
Under Connection, select the PCR to control or release it from control.
Establishing communication
|
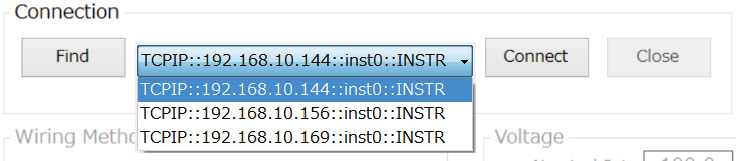
1 |
Tap Find to search for PCRs that can be controlled. The IP addresses of the PCRs that can be controlled appear. |
|
2 |
Select the IP address of the PCR that you want to control. If several IP addresses appear, be sure to check the IP address from the PCR front panel, and then make the selection. If the IP address that you want to control does not appear, check the VISA settings. In the case of KI-VISA, tap KI-VISA IO Config on KI-VISA Instrument Explorer to open KI-VISA IO Config. On the LAN tab, tap Search Now to search for LAN instruments. |
|
3 |
Tap Connect to establish communication. When communication is established, you can control the PCR with SD021-PCR-LE/WE. |
SD021-PCR-LE/WE stores the IP address that it controlled the previous time. If the target PCR is in the network communication range, communication will be established automatically when you start SD021-PCR-LE/WE.
Configuration changes on the PCR to be controlled
When communication is established, the following PCR functions are changed to their factory default conditions.
•Soft start
•Waveform bank
•Output on and off phases
•U-V phase difference (for single-phase three-wire output and three-phase output), U-W phase difference (for three-phase output)
If the PCR voltage setting is unbalanced, the voltages of all phases are changed to the U-phase voltage (for single-phase three-wire output and three-phase output).
Output impedance setting is changed to disable.
If communication is established in the middle of a power line abnormality simulation or sequence execution, the simulation or sequence is aborted.
Releasing communication
Tap Disconnect to release communication.
Communication cannot be released while monitoring.
![]() RMT CONT SOFTWARE FOR PCR-LE/PCR-WE SD021-PCR-LE
RMT CONT SOFTWARE FOR PCR-LE/PCR-WE SD021-PCR-LE
Operation Guide